Pages

Tuesday, January 29, 2013

Beautiful snow fall


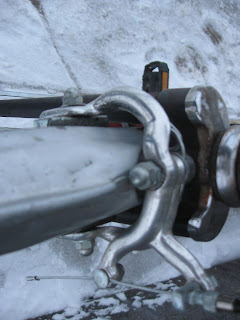
Last night i went out to shovel and when i got done i hopped onto  my three speed Abbey and tried to go for a short ride, well it was short alright, i made it about twenty feet out of my driveway and got stuck, but i did get some good pictures out of it any way.   the snow this morning was eight inches deep, i tried to use my Gary Fisher 28" and all i did was spin my wheels, there were a few spots that were ridable but not many.  When i did accually get going in the snow i was fish tailing as much the cars were. it's about nine o'clock and the plows still haven't gone by yet and usually have by now. i think they will go by pretty soon, they went by on fourth street but not on third, so i'm kind of stuck in the middle, but i think i'll get out. 

On a sad note, on saturday my computer died, i lost all my pictures that i didn't post, and much more important paper work, but i hope to regain it soon.  I will post again soon, sometime on wednesday or thursday hopefully.


This one could almost be used on a post card.


Keep on Biking...


Sunday, January 27, 2013

Snow, Ice, and Salt: what it does to your bike


As most of you know, i winter commute, and for those of you who do the same you know what your bike looks like at the end of each trip.  Snow, ice and road salt collect in your fenders, under the bottom bracket, and if you don't have fenders, on the bottom tube. I have heard all kinds of methods on how to take care of your bike in the winter to make it last.  I have heard that you need to clean it after every ride, bring it inside when your done riding, or even just leave it outside with the snow, and ice left on it.

Well some of that is good and some not so.  What i recommend is to not bring it inside over night and leave it outside in the garage, shed, or really well locked to a post or something.  If you bring it inside all that salt ans snow will melt and speed up the rusting process on your cables, chain, and other exposed metal parts, even if you knock off all the snow and ice. i would recommend is when you leave your bike outside, knock off all the snow and ice deposits. If you have a multi speed bike with a derailleur and you always have trouble shifting in the morning when you leave in the morning, at the end of every ride shift it into the middle cog so that in the morning all you have to do is shift into the low gears and not have to kick your derailleur to make it move.  Also do the same thing with front derailleur if you have that problem.

If you have to take your bike inside everyday make sure that you knock off all the deposits and then when you get it into your house or apartment clean your bike off with a cleaner.  Clean your frame, cables, everything...  get into the nooks and crannies especially where there's metal exposed, that's where the rust will start.

Another thing i would recommend is to buy and install a sealed bottom bracket so prevent dirt, snow, ice, salt, and anything else that you don't want in there.  Another great tip, get a bike or rear hub for your current bike that has internal shifting, with everything internal you don't have to worry about snow clogging up your cassette and rear derailleur.  You can buy hubs or bikes with internal shifting with a number of speeds from 2 to 14 speeds in one hub, but the higher the speeds the higher the price, so be careful what you get cause it may cost you more than you want to spend.

I am going to be doing a conversion on my recumbent and eliminating both derailleurs.  I'm going to try and put on an internal eight speed hub, i'm not sure if it will work, but i will know Tuesday afternoon.  The only problem I can see is that i have a vertical rear dropout, and not a horizontal rear dropout, the nice thing about having a horizontal rear dropout is that you can adjust chain tension more than you can with a vertical dropout. I'll let you know what happens after Tuesday.

Keep on Biking....

Thursday, January 24, 2013

Doing a tune up on your bike

When it's time to get your bike tuned up for the year, you don't want to have to pay $30-$60 just to have it done, when you can do it yourself. even if you don't know much about repairing or doing things with your bike, that's ok.  If you have a friend that knows some about repairs see if you can get them to help you if you want.  When doing a tune up there are eight things you need to look at:

  1. Headset: 
    1. you'll need to take your handlebar stem out of your fork/headset.  then get a 30/32/36 depending on the size of your headset, and take off your headset nut, washer, and bearing cup. Take out your fork and your bearings.  Grease up your bearing with white lithium grease, i have found this to work the best, even in the winter.  Clean out where the bearing sit and put a little bit of grease there as well, and put it all back together.
  2. Brakes:
    1. First inspect your brake pads, if your pads still have the groves in them they are fine, but if they are smooth, that's when you need to replace them. 
    2. Most bikes now have quick release so that it makes it easier to remove the wheels.  undo your quick release and inspect your cables on both the front and the rear brakes.  if any of them have rust  or look like they are getting rust forming on them, replace them. better safe then sorry.  make sure that both brake arms can move freely and don't stick, if they do, remove them and clean them with any household glass cleaner, works to remove any unwanted grease.  
    3. Put them all back together and make sure that they function and grip like you want.
  3. Derailleurs:
    1. Clean them
    2. make sure that the cables are not rusting, if so replace them.
    3. make sure that they work properly, and that your chain doesn't skip, if so, you can watch the how to adjust a derailleur video by clicking the repair videos tab up top.
    4. Finally inspect the shifter(s), make sure that there is no slipping when changing gears.
  4. Tires:
    1. Inspect your tire and tube
    2. make sure that there is no cracking or holes in the sidewalls of your tires
    3. remove tube(s) and inspect them for holes or cracks as well
  5. Wheels/Rims:
    1. While you have your tire and tube off inspect the inside or your rim and check for rust, make sure that your rim strip is not rotting or wearing away, plus make sure that no spokes are sticking out where they could poke your tube and give you a flat later on down the road.
  6. Spokes:
    1. Check every spoke
    2. remove any rust or dirt
    3. if one is bent or broken have your local bike shop replace them if you don't know how to. Also have them true (straighten) you wheel as well, if needed.
  7. Clean:
    1. Clean any other part of your bike that you haven't already cleaned
  8. Test Ride:
    1. Go for a test ride and make sure that everything functions the same or better than it did before you tuned it up.
If you have any questions, do not be afraid to ask your local bike shop(s) for help, they only charge you if you have them do the work, the advice is free.  Good luck and you can also ask me questions if you like, just leave them in the comment box, and I will reply to your question so check back often, or if it's a really good question, i will reply in a post.

Keep on Biking....

Wednesday, January 23, 2013

Finally got out of the house

Yesterday i got out on the bike and it felt really good, but the temperature was still below zero.  My derailleur was frozen up and i was stuck in tenth gear for half a mile. I rode around town for awhile and ran a few errands. when i was done i stopped for some black tea, and a donut, but when i can out to ride home i found out that my front tire was flat.  the temp was about -10 with a little wind chill of course.  i had to walk to the bike shop and pump up the tube because we were all out of 28"/700c tubes, so i grabbed the front tire and rim of of my miyata 27 x 1 1/4.  I made 3/4ths of the way home with the 60psi that i put into the tube on my bike, do i switched it to the 27" and got the rest of the way home.  When I took the tube out I found that there was just a pin hole in it that was caused by one of my Replacement studs (i used #6 x 1/2" construction screws with flat heads screwed from the inside out, and i snipped of part of the tip that stuck out). So i patched up the hole and put some more duct tape over the inside of the tire, give more layers over the screw heads.  I hope that this below zero cold spell doesn't stay around long, i'm  sick of it, and my bike doesn't like it much either.

Keep on Biking...

Tuesday, January 22, 2013

Cabin Fever

We have been having below zero temps and i hate it.  Our temperature yesterday we had -43, and this morning have -23 temp. and -38 wind chill.  you can't really go out because your skin will freeze in minutes.  That's the only thing i hate about winter is that the temp dips below zero and make the chance of getting frostbite a lot easier. The temps will start to warm up some today and into next week, i hope... I have my Raleigh Concord on my trainer so that i can do some riding inside so i can still get some exercise.  I'll post again soon, if i don't go insane from being stuck inside.

Keep on Biking...

Monday, January 14, 2013

Dan’s Unique Raleigh


Today I was working at the bike shop when Dan rolls in with one of his Raleigh’s, and I had to take a double take because this is what I saw:


This Raleigh looks like it’s from the 1940’s, right looks like, really made in 1984, in the most unique place; Holland, that’s right Holland.  It’s a three speed with drum brakes.  Dan built the wheels, with black touring spokes, the original Brooks saddle, and rear rack.  The drive train is all encased in a full metal chain case.
 
The Sturmey Archer generator lights are fully integrated into the frame of the bike.  The wiring runs through the frame, and rear fender as well as the handlebar stem.  The upper rear tail light doesn’t work anymore, it used to flash, but Dan took it apart and the cell board looked fried, I mentioned that he could try and bypass the cell board and do steady on light, he thought it might work. 
 
Dan has a Carradic saddle bag that he had just recently gotten from Diane P.  It attaches underneath the saddle in the springs. 
 
Dan has it at the shop at the moment, because he needs to do some work on it, one of the clamps for the three speed cable and housing let loose, and the cable is a little bit short so he needs to get that fixed before he can ride it again.  Overall this is a very nice and Unique bike and one that is not seen very often.

Keep on Biking….

Saturday, January 12, 2013

Cycling into the sunset

The other day when I got done at working at the bike shop, i went for a evening bike ride on the snowmobile trails.  The sun was just starting to go down, and the sun was beaming across the snow and it looked like the snow was blue because of the sunset.  It was about 38 degrees out and the wind wasn't too bad.  I don't mind biking in the winter, especially when the temp. is warm and the winds are low. I would have to say i like summer a lot better, but oh well.  In the winter time you can see the snow crystals sparkle in the sunlight, and the deer and the squirrel tracks, and the ever once and awhile owl wing imprints from grabbing a mouse or mole.  
In the winter you can walk, bike or drive out onto the lake and ice fish or just bike around on the ice.  With the ice and snow you can use studded tyres and skid around for fun.  You can make snow balls and throw them at each other.  You can also make snowmen as well.
When i have the chance to bike during a sunset, i will.  Even if it means that i get home in the dark, but my light will guide me home.  When i look out my window in the morning and see all the snow on the ground and feel how cold the window from the below freezing air, I automatically think, i don't want to go out in this, but than i think this is no different than when i was out in this yesterday, but the one thing i always remember.  Spring will be here in no time at all.  


Keep on Biking....

Wednesday, January 9, 2013

Homemade Studded Tyres

For the last few weeks i have been trying to come up with a way to make my own studded tyres without puncturing my tubes.  I went to my local hardware store and was looking at all the different types and sizes of screws and i found some sort of cheap screws, that work well as studs.  They come in packs of 50, and are around $2.50 a pack, they are made of yellow zinc, and are #6 x 1/2" (they are Construction Screws for multiple-materials). 
make sure that the screw driver that you use, fits in the head really well, it helps.
I'm using Schwalbe (race guard) Marathon Racer tyres.  I have here a twenty inch tyre.
it's my front tyre of my recumbent, i am working on a studded rear twenty-six inch tyre. 
the screws as they stick out of my tyre before i cut them down.

the flat heads of the screws on the inside of the tyre.

If you are wanting to make your own, here are the steps on how I am doing it:
Materials:
  • #6 x 1/2 construction screws
  • Phillips Screw driver
  • Tyres that fit your bike
  • and a couple hours of time
Directions:

  1. Get your tyre
  2. Decide where you want to put your studs in your tyre
  3. mark where you want to put your studs
  4. Take your screws and screw them into the tyre from the outside on your marks (do that all the way around your tyre)
  5. Take out one screw at a time and screw them into the tyre from the inside where you see your holes from the screws.
  6. Take metal wire cutters or a tough metal cutter, and cut off the the tip so that it doesn't stick out too far, but you still have a good sized stud left.
  7. When you get done and have all your screws pointing outward, take duct tape and line the inside of your tyre.  (so that the screw heads don't puncture your tubes.).
  8. Install your tube and tyre back on your rim and go for a ride.
I am working on getting a bunch of tyres in different sizes prepared, i may possibly start selling these if they work like i'm hoping they will.  If i start sell these, i will post an update and i will post prices and tyre sizes in the "Repairs" page under Repairs/Parts.  When i get both tyres fully completed i will post some pictures.  If you decide to make a pair like these, let me know how you like them and your experiences while making them, Have Fun.

Keep on Biking....

Friday, January 4, 2013

Royal Mess

I have gotten the Royal men's bike to work, but it reminds me of the Johnny Cash song "One piece at a time."
this is the actual Johnny Cash, One piece at a time car. 

How he had many different parts from different cars and years, well that's how this one turned out to look.  The handlebar grips are from a old mid 70's Schwinn cruiser, and SRAM 9.0 brake levers,

 the seat is from a Schwinn mtn bike,

 the bottom bracket is from a Bianchi,

the cantilever brakes are from a Raleigh.
(Sorry that the pictures are turned, my computer is very weird that way.)
 The rear derailleur i'm not sure what kind of bike it came off of, but the from one i know came off of a Magna mtn bike that i worked on awhile a go.  I took it off because it didn't work with all the chainrings.  It looks like a mess but when you really look at it and see all the different parts and where they came from, it starts to grow on you. I'm still unsure whether or not i want to paint it or not, but if i do, i would paint it black, that was the original color.  It looks good that way, i can't imagine it in a bright color.  If i do decide to paint it i will post pictures, but it's not looking like going to til spring.

Keep on Biking....